hexo 安装与配置

总想弄个自己的博客,写一些东西(或感悟、或经验、或代码、或计划)。选择困难症的我纠结到底是用CSDN还是新浪抑或网易……还有很多,都挑花眼了,各有各的有点,也各有各的不足。那么到头来我为什么选择了Hexo + GitHub 来创建自己的博客呢?因为它没广告啊!!!当然还可以根据自己的喜好选择喜欢的主题,同时看着自己的作品是不是有一种满足感呢?最后,作为一个程序猿用别的博客怎么能体现程序猿的与众不同呢?

Hexo 简单介绍

hexo 是一个基于Node.js的静态博客框架,可以方便的生成静态网页并且托管在github 上。hexo是一个开源的博客框架,我们可以任意使用修改,但是很多功能要自己去实现,没有计算机基础的人使用起来可能比较困难。

准备

前面提到hexo是基于Node.js的博客框架,所以安装Hexo之前需要先Node.js 和设置 github(托管代码)

GitHub 设置

  • 首先你要注册一个github帐号
  • 创建一个库(new repository)命名为YourSiteName.github.io/
  • 根据自己的喜好简单设置一下github生成的静态网页

请参考

下载Git

安装Node.js

下载Node.js 并安装

Hexo 安装

  • 安装
1
$ npm install -g hexo-cli
  • 初始化

安装完成后,建一个文件夹(如hexo),执行以下指令(在hexo路径下),Hexo 即会自动在目标文件夹建立网站所需要的所有文件

1
$ hexo init
  • 查看博客
1
2
$ hexo g
$ hexo s

然后在浏览器中输入localhost:4000 就可以看到你的博客了。

如果安装过程中出现错误可以尝试在命令行前加上 sudo

详情请参考

Hexo 基本使用

既然博客已经安装好了,那么怎么写博客呢?博客是基于MarkDown语法的,不了解MarkDown的请点击这里

编辑器MAC环境下免费的有Mou 和MacDown 比较给力,其他的不熟悉。

  • 创建文件
1
$ hexo new "Hexo使用"

或者直接进入hexo\source\_posts路径下添加 xxx.md 类型的文件,然后打开文件编辑

title: Hexo使用    // 标题
categories: hexo    // 分类
tags: [hexo,blog]  //标签,多个用逗号隔开
---

#这里是正文,用markdown编写
  • 预览
1
2
3
4
5
6
7
8
9
10
11
12
13
14
15
16
17
18
19
20
21
22
23
24
25
26
27
28
29
30
31
32
33
34
35
36
37
38
39
40
41
42
43
44
45
46
47
48
49
50
51
52
53
54
55
56
57
58
59
60
61
62
63
64
65
66
67
68
69
70
71
72
73
74
75
76
77
78
79
80
81
82
83
84
85
86
87
88
89
90
91
92
93
94
95
96
97
98
99
100
101
102
103
104
105
106
107
108
109
110
111
112
113
114
115
116
117
118
119
120
121
122
123
124
125
126
127
128
129
130
131
132
133
134
135
136
137
138
139
140
141
142
143
144
145
146
147
148
149
150
151
152
153
154
155
156
157
158
159
160
161
162
163
164
165
166
167
168
169
170
171
172
173
174
175
176
177
178
179
180
181
182
183
184
185
186
187
188
189
190
191
192
193
194
195
196
197
198
199
200
201
202
203
204
205
206
207
208
209
210
211
212
213
214
215
216
217
218
219
220
221
222
223
224
225
226
227
228
229
230
231
232
233
234
235
236
237
238
239
240
241
242
243
244
245
246
247
248
249
250
251
252
253
254
255
256
257
258
259
260
261
262
263
264
265
266
267
268
269
270
271
272
273
274
275
276
277
278
279
280
281
282
283
284
285
286
287
288
289
290
291
292
293
294
295
296
297
298
299
300
301
302
303
304
305
306
307
308
309
310
311
312
313
314
315
316
317
318
319
320
321
322
323
324
325
326
327
328
329
330
331
332
333
334
335
336
337
338
339
340
341
342
343
344
345
346
347
348
349
350
351
352
353
354
355
356
357
358
359
360
361
362
363
364
365
366
367
368
369
370
371
372
373
374
375
376
377
378
379
380
381
382
383
384
385
386
387
388
389
390
391
392
393
394
395
396
397
398
399
400
401
402
403
404
405
406
407
408
409
410
411
412
413
414
415
416
417
418
419
420
421
422
423
424
425
426
427
428
429
430
431
432
433
434
435
436
437
438
439
440
441
442
443
444
445
446
447
448
449
450
451
452
453
454
455
456
457
458
459
460
461
462
463
464
465
466
467
468
469
470
471
472
473
474
475
476
477
478
479
480
481
482
483
484
485
486
487
488
489
490
491
492
493
494
495
496
497
498
499
500
501
502
503
504
505
506
507
508
509
510
511
512
513
514
515
516
517
518
519
520
521
522
$ hexo g  
$ hexo s
$ 访问localhost:4000预览效果。(退出server用Ctrl+c)
```

- 提交到git

编辑hexo\\_config.yml,把下面的 abc 换成你的用户名。

``` bash
# Deployment
## Docs: https://hexo.io/docs/deployment.html
deploy:
type: git
repository: https://github.com/abc/abc.github.io
```

保存文件并运行

``` bash
$ hexo g
$ hexo s
$ hexo d
```

然后在浏览器输入abc.github.io 就能看到 Git 的博客发生了变化。

## Hexo 配置

Okay

Hexo 的基本使用已经结束了,下面是怎样装饰你的博客了,如果你对默认的样式很满意,后面的可以跳过了。

我这里使用的主题是[next](http://theme-next.iissnan.com/)

Hexo 有两个配置文件,在hexo路径下的 _config.yml 文件是 `站点配置文件` ,在 hexo\themes\hexo-theme-next 路径下的 _config.yml 文件是`主题配置文件`。

### 配置文件

- 站点配置文件

# Hexo Configuration
## Docs: https://hexo.io/docs/configuration.html
## Source: https://github.com/hexojs/hexo/

# Site 这里的配置可以参考我的博客
title: Try、Try Again!The worst result is failure! // 博客title
subtitle: // 副标题
description: 以出以入,以就鲜絜,似善化。其万折也必东,似志。是故君子见大水必观焉。 -- 荀子·宥坐 // 描述
author: 东折 // 作者
language: zh-Hans // 使用语言
timezone:
email: zhd_dong@163.com // 邮箱

# URL 这里没有设置
## If your site is put in a subdirectory, set url as 'http://yoursite.com/child' and root as '/child/'
url: http://yoursite.com
root: /
permalink: :year/:month/:day/:title/
permalink_defaults:

# Directory 这里没有设置
source_dir: source
public_dir: public
tag_dir: tags
archive_dir: archives
category_dir: categories
code_dir: downloads/code
i18n_dir: :lang
skip_render:

# Writing 这里没有设置
new_post_name: :title.md # File name of new posts
default_layout: post
titlecase: false # Transform title into titlecase
external_link: true # Open external links in new tab
filename_case: 0
render_drafts: false
post_asset_folder: false
relative_link: false
max_open_file: 100
future: true
highlight:
enable: true
line_number: true
auto_detect: false
tab_replace:

# Category & Tag
default_category: uncategorized
category_map:
tag_map:


#archive: 1
#category: 1
#tag: 1

# Date / Time format
## Hexo uses Moment.js to parse and display date
## You can customize the date format as defined in
## http://momentjs.com/docs/#/displaying/format/
date_format: YYYY-MM-DD
time_format: HH:mm:ss

# Pagination
## Set per_page to 0 to disable pagination
per_page: 10 // 这里设置一页显示多少条博客
pagination_dir: page

# Extensions
## Plugins: https://hexo.io/plugins/
## Themes: https://hexo.io/themes/
theme: hexo-theme-next // 在这里设置想要的主题(主题对应的文件夹的名称)

duoshuo_shortname: yulncbd // 这里添加多说评论

# Deployment // 这里设置Git 的相关信息
## Docs: https://hexo.io/docs/deployment.html
deploy:
type: git
repository: https://github.com/YulncBd/YulncBd.github.io // 这里将YulncBd替换成自己用户名


`站点配置文件` 主要配置了博客简介,git,多说评论等一些信息。自己可以尝试一下其他的设置,看看什么效果。设置完成后执行一下命令查看结果

hexo g
hexo s
hexo d

到用浏览器打开 `localhost:4000` 查看效果,再到 `你的用户名.github.io` 查看Git 上你博客的变化。

- 主题配置文价

可以打开 zh-Hans.yml 文件查看对应的汉字设置

# ---------------------------------------------------------------
# Site Information Settings
# ---------------------------------------------------------------

# Put your favicon.ico into `hexo-site/source/` directory.
favicon: /favicon.ico

# Set default keywords (Use a comma to separate)
keywords: "Hexo, NexT"

# Set rss to false to disable feed link.
# Leave rss as empty to use site's feed link.
# Set rss to specific value if you have burned your feed already.
rss: false

# Specify the date when the site was setup
since: 2016


# ---------------------------------------------------------------
# Menu Settings
# ---------------------------------------------------------------

// 这里设置导航栏(添加了分类 和 标签,具体设置后面在介绍)
# When running the site in a subdirectory (e.g. domain.tld/blog), remove the leading slash (/archives -> archives)
menu:
home: /
archives: archives
categories: categories
tags: tags
#about: about
#tags: /tags
#commonweal: /404.html

// 这里设置导航栏对应的图片
# Enable/Disable menu icons.
# Icon Mapping:
# Map a menu item to a specific FontAwesome icon name.
# Key is the name of menu item and value is the name of FontAwsome icon. Key is case-senstive.
# When an question mask icon presenting up means that the item has no mapping icon.
menu_icons:
enable: true
#KeyMapsToMenuItemKey: NameOfTheIconFromFontAwesome
home: home
about: user
categories: th
tags: tags
archives: archive
commonweal: heartbeat
search: search


# ---------------------------------------------------------------
# Scheme Settings
# ---------------------------------------------------------------

// 这里设置主题的样式(可以都选择看一下效果)
# Schemes
#scheme: Muse
#scheme: Mist
scheme: Pisces


# ---------------------------------------------------------------
# Font Settings
# - Find fonts on Google Fonts (https://www.google.com/fonts)
# - All fonts set here will have the following styles:
# light, light italic, normal, normal intalic, bold, bold italic
# - Be aware that setting too much fonts will cause site running slowly
# - Introduce in 5.0.1
# ---------------------------------------------------------------
font:
enable: true

# Uri of fonts host. E.g. //fonts.googleapis.com (Default)
host:

# Global font settings used on <body> element.
global:
# external: true will load this font family from host.
external: true
family: Lato

# Font settings for Headlines (h1, h2, h3, h4, h5, h6)
# Fallback to `global` font settings.
headings:
external: true
family:

# Font settings for posts
# Fallback to `global` font settings.
posts:
external: true
family:

# Font settings for Logo
# Fallback to `global` font settings.
# The `size` option use `px` as unit
logo:
external: true
family:
size:

# Font settings for <code> and code blocks.
code:
external: true
family:


# ---------------------------------------------------------------
# Sidebar Settings
# ---------------------------------------------------------------

// 这里设置一些网站链接
# Social Links
# Key is the link label showing to end users.
# Value is the target link (E.g. GitHub: https://github.com/iissnan)
social:
简书: http://www.jianshu.com/
GitHub: https://github.com/
知乎: http://www.zhihu.com
豆瓣: https://www.douban.com/

// 这里设置链接的图片
# Social Links Icons
# Icon Mapping:
# Map a menu item to a specific FontAwesome icon name.
# Key is the name of the item and value is the name of FontAwsome icon. Key is case-senstive.
# When an globe mask icon presenting up means that the item has no mapping icon.
social_icons:
enable: true
# Icon Mappings.
# KeyMapsToSocalItemKey: NameOfTheIconFromFontAwesome
GitHub: github
Twitter: twitter
Weibo: weibo

// 这里设置头像
# Sidebar Avatar
# in theme directory(source/images): /images/avatar.jpg
# in site directory(source/uploads): /uploads/avatar.jpg
avatar: /uploads/avatar.png


# Table Of Contents in the Sidebar
toc:
enable: true

# Automatically add list number to toc.
number: true


# Creative Commons 4.0 International License.
# http://creativecommons.org/
# Available: by | by-nc | by-nc-nd | by-nc-sa | by-nd | by-sa | zero
#creative_commons: by-nc-sa
#creative_commons:

// 这里设置导航居左还是居右
sidebar:
# Sidebar Position, available value: left | right
position: left
#position: right

# Sidebar Display, available value:
# - post expand on posts automatically. Default.
# - always expand for all pages automatically
# - hide expand only when click on the sidebar toggle icon.
# - remove Totally remove sidebar including sidebar toggler.
display: post
#display: always
#display: hide
#display: remove


# ---------------------------------------------------------------
# Misc Theme Settings
# ---------------------------------------------------------------

# Custom Logo.
# !!Only available for Default Scheme currently.
# Options:
# enabled: [true/false] - Replace with specific image
# image: url-of-image - Images's url
custom_logo:
enabled: false
image:

// 这里设置代码段的背景色
# Code Highlight theme
# Available value:
# normal | night | night eighties | night blue | night bright
# https://github.com/chriskempson/tomorrow-theme
highlight_theme: night bright


# Automatically scroll page to section which is under <!-- more --> mark.
scroll_to_more: true

// 这里设置博客显示信息
# Automatically Excerpt. Not recommand.
# Please use <!-- more --> in the post to control excerpt accurately.
auto_excerpt:
enable: true // 博客能否收起
length: 200 // 博客收起后显示高度
excerpt_link: read_more #替换为中文 // 阅读全文


# Wechat Subscriber
wechat_subscriber:
enabled: false
qcode: /path/to/your/wechatqcode ex. /uploads/wechat-qcode.jpg
description: hello ex. subscribe to my blog by scanning my public wechat account


# ---------------------------------------------------------------
# Third Party Services Settings
# ---------------------------------------------------------------

# MathJax Support
mathjax:
enable: true
cdn: //cdn.mathjax.org/mathjax/latest/MathJax.js?config=TeX-AMS-MML_HTMLorMML


# Swiftype Search API Key
#swiftype_key:

# Baidu Analytics ID
#baidu_analytics:

# Duoshuo ShortName
#duoshuo_shortname:

# Disqus
#disqus_shortname:

# Baidu Share
# Available value:
# button | slide
#baidushare:
## type: button

# Share
#jiathis:
#add_this_id:

# Share
#duoshuo_share: true

# Google Webmaster tools verification setting
# See: https://www.google.com/webmasters/
#google_site_verification:


# Google Analytics
#google_analytics:

# CNZZ count
#cnzz_siteid:

// 设置多说的信息
# Make duoshuo show UA
# user_id must NOT be null when admin_enable is true!
# you can visit http://dev.duoshuo.com get duoshuo user id.
duoshuo_info:
ua_enable: true
admin_enable: false
user_id: 0
#admin_nickname: Author
Author: hello

// 设置Facebook信息
# Facebook SDK Support.
# https://github.com/iissnan/hexo-theme-next/pull/410
facebook_sdk:
enable: false
app_id: #<app_id>
fb_admin: #<user_id>
like_button: #true
webmaster: #true


# Show number of visitors to each article.
# You can visit https://leancloud.cn get AppID and AppKey.
leancloud_visitors:
enable: false
app_id: #<app_id>
app_key: #<app_key>

# Show PV/UV of the website/page with busuanzi.
# Get more information on http://ibruce.info/2015/04/04/busuanzi/
busuanzi_count:
# count values only if the other configs are false
enable: false
# custom uv span for the whole site
site_uv: true
site_uv_header: <i class="fa fa-user"></i>
site_uv_footer:
# custom pv span for the whole site
site_pv: true
site_pv_header: <i class="fa fa-eye"></i>
site_pv_footer:
# custom pv span for one page only
page_pv: true
page_pv_header: <i class="fa fa-file-o"></i>
page_pv_footer:

# Tencent analytics ID
# tencent_analytics:

# Enable baidu push so that the blog will push the url to baidu automatically which is very helpful for SEO
baidu_push: false


#! ---------------------------------------------------------------
#! DO NOT EDIT THE FOLLOWING SETTINGS
#! UNLESS YOU KNOW WHAT YOU ARE DOING
#! ---------------------------------------------------------------

# Motion
use_motion: true

# Fancybox
fancybox: true


# Script Vendors.
# Set a CDN address for the vendor you want to customize.
# For example
# jquery: https://ajax.googleapis.com/ajax/libs/jquery/2.2.0/jquery.min.js
# Be aware that you should use the same version as internal ones to avoid potential problems.
vendors:
# Internal path prefix. Please do not edit it.
_internal: vendors

# Internal version: 2.1.3
jquery:

# Internal version: 2.1.5
fancybox:

# Internal version: 1.0.6
fastclick:

# Internal version: 1.9.7
lazyload:

# Internal version: 1.2.1
velocity:

# Internal version: 1.2.1
velocity_ui:

# Internal version: 0.7.9
ua_parser:


# Assets
css: css
js: js
images: images

# Theme version
version: 5.0.1

// 这里设置的是打赏的信息
# Donate 文章末尾显示打赏按钮
reward_comment: 如果觉得写的不错,那就打赏一下吧! // 文字提示
wechatpay: /uploads/weixin.png //微信图片(本地图片或网络图片)
#alipay: 此处为支付宝向我付款二维码图片的相对或者是绝对URL


### 分类和标签

- 添加分类

```bash
cd hexo // 进入博客路径
hexo new page categories // 创建分类页面

然后进入到hexo\source\ categories路径下打开index.md文件,编辑保存。

---
title: categories
date: 2016-04-26 16:17:21
 type: "categories"
---

在主题配置文件里设置

menu:
    home: /
    archives: archives
    categories: categories   // 如果有问题在前面加一个反斜杠
    tags: tags
    #about: about
    #commonweal: /404.html
  • 添加标签
1
2
cd hexo   // 进入博客路径
hexo new page tags // 创建分类页面

然后进入到hexo\source\ tags路径下打开index.md文件,编辑保存。

---
title: tags
date: 2016-04-26 16:17:21
 type: "tags"
---

在主题配置文件里设置

menu:
    home: /
    archives: archives
    categories: categories   
    tags: tags  // 如果有问题在前面加一个反斜杠
    #about: about
    #commonweal: /404.html

最后发表一篇文章(设置好分类和标签),执行一下命令查看结果

1
2
3
hexo g
hexo s
hexo d

头像

要在 source 路径下创建文件夹 uploads ,然后将要设置的图片拷到这里,设置如下

avatar: /uploads/avatar.png   // 在主题配置文件里设置(也可以用网络链接)

打赏

在主题配置文件底部添加以下代码:

// 这里设置的是打赏的信息
# Donate 文章末尾显示打赏按钮
reward_comment: 如果觉得写的不错,那就打赏一下吧! // 文字提示
wechatpay: /uploads/weixin.png  //微信图片(本地图片或网络图片)
#alipay: 此处为支付宝向我付款二维码图片的相对或者是绝对URL

图片的设置同头像设置一致。

多说评论

额,以为很麻烦,所以一开始没有设置,后来有时间想设置一下,发现 so easy!

先到多说 去申请一个站点,步骤如下:

1.登录后在首页选择 我要安装

2.创建站点,填写表格,多说域名这一栏填写的即是你的 duoshuo_shortname,如图:

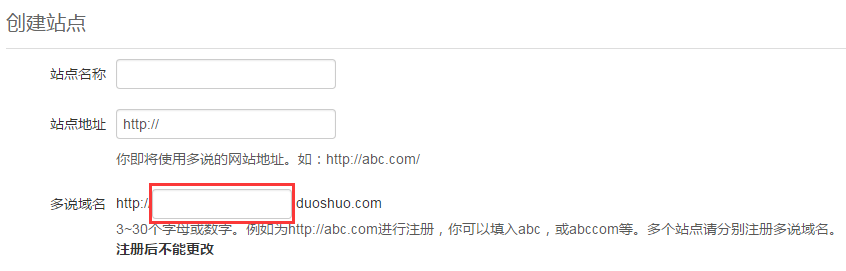
3.创建站点完成后在 站点配置文件 中新增 duoshuo_shortname 字段,值设置成上一步中的值。

不用别的操作,只有3步就搞定。

总结

以上的设置只是一些基本的设置,先把博客用起来,后面在慢慢的去了解,去深入。关于404公益页面,域名,统计,搜索等功能暂未实现,感觉博客没必要弄那么多不必要的功能,如果你感兴趣可以去研究一下。

如果觉得写的不错,那就打赏一下吧!